This post could have been titled:
- Why and How to Use an Offhand Device for Radiology
Or maybe even:
- How to Make the Most of All Those Extra Buttons on Your Gaming Mouse or Similar Device
We’ll be talking about using productivity devices to make diagnostic radiology more biomechanically (and functionally) efficient. I was personally more focused on the former (repetitive stress is no joke), but both are important. Even if you don’t want to read more cases per day, reading the same number of cases with less friction is still a win.
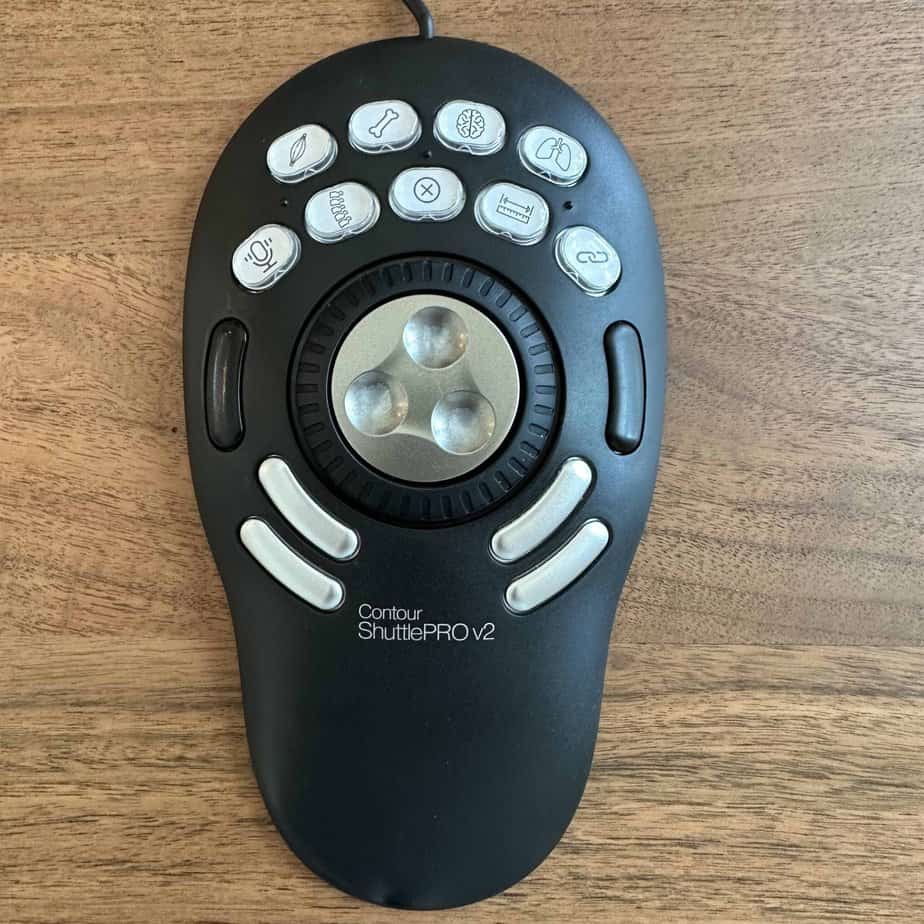
This discussion applies broadly, but we’ll be doing so through the example of my current left-hand device: The Contour Shuttle Pro V2, a weird little ambidextrous off-hand device mostly used by video editors:
The principles of optimizing your radiology workflow and customizing tools for manipulating PACS are nonspecific. Whether you use this device, some sort of gaming/productivity mouse, or a combination (with or without the help of AutoHotkey), there is a lot you can do to streamline and improve your day-to-day practice.
(See this post for a thorough breakdown of microphones, mice, peripherals, and other workstation equipment).
The Goal
The goal, no matter what device(s) you use, is to be able to keep your hands in an efficient and comfortable position most of the time. If you’re still intent on holding a dictaphone, you want mouse controls robust enough that you don’t have to keep putting the dictaphone down in order to use PACS tools like utilizing window/level presets or making measurements.
If you’re still intermittently dropping the mic, it means you can’t effectively dictate when manipulating the information at your disposal.
Ideally, you’ll ditch the hand-held microphone and use a combination of a mouse and an off-hand device to be able to ignore the keyboard on routine cases. If your hands don’t need to move from their respective home bases, then you’re winning.
Visuospatially and with regards to muscle memory, I find it much easier to put some of the tools on my left-hand device as opposed to having everything I need put into a complicated grid of right-hand thumb buttons (but that is absolutely an option!).
My advice if you’re just starting out on the efficiency/ergonomics/productivity journey: make note of all the tasks you normally do when reading routine cases throughout your work day, add them all up, and then pick a combination of devices that get you there. How much you’ll need depends on how you work and what PACS you have.
If you choose the Shuttle like me, then you can pick a mouse that incorporates enough customizable functionality that the combination is sufficient. If you suffer from chronic wrist pain, consider a vertical mouse. You may find that a simple ergonomic mouse gets the job done, or you may find that your appetite for hotkeys is limitless.
The goal: one hand, one device.
Off-hand Device Alternatives
The Shuttle is my current device of choice, but there are several other devices that are solid options with different pros and cons. In particular, the best choice for an off-hand device depends on the exact use case and the motivation behind it.
Considerations: Can you install drivers/software or do you need a device with onboard memory that will work plug-and-play on any computer? Do you want a ton of buttons, and if so, how much muscle memory do you want to build? How important is repetitive stress in your life and how much do you want to spread scrolling behaviors?
Personally, I want some efficiency but don’t necessarily need a gazillion shortcuts to get through the majority of my work, and I really want really useful and flexible scrolling options. I got the Shuttle to help me stop overusing my right hand for the same handful of motions for half of my waking hours, and it has the best programmable scrolling behavior of anything I’ve seen. It’s comfortable to use, and I now currently scroll much more with my left hand than my right.
Here are a few strong alternatives:
- Razer Tartarus V2
- Elgato Stream Deck
- XENCELABS Quick Keys
- KEEBMONKEY Megalodon (my personal backup option)
- Other one-hand macro keyboards like the ELSRA Smart (23 keys) or one of the options from Koolertron (up to 48 keys)
These are all valid choices. I think the Shuttle has the best scrolling behavior, but the Quick Keys does include a scrolling wheel, and the Tartarus also has a mouse-style scroll wheel and a thumb joystick. I also like the KEEBMONKEY Megalodon, which has a scroll wheel (but no outer dial), is easily programmable, has on-board memory, and lots of keys (but you’ll need to separately buy and pop in your own keycaps [like these or these]). The smaller Megalodon version has a smaller knob without a finger divot that I don’t think would help for scrolling nearly as much.
But if you think the variations stop there, be warned that the profession of video editing keeps providing new interesting and elaborate options.
If you need a solution that doesn’t require drivers/software, the ELSRA Smart, Koolerton, and several other one-hand macro keyboards have onboard memory. These are very handy even if they aren’t especially ergonomic. The ones from companies you’ve actually heard of all require software, which means at the hospital you’ll need to call IT.
For the southpaws among us, note that the Tartarus is designed for right-handed individuals to be used with their left hand. The rest are ambidextrous.
AutoHotkey Synergism
All solutions are much more powerful when paired with simple AutoHotkey scripts.
If nothing else, you want your device to be able to mimic the dictation controls of the current hand-held microphone you’re probably giving up. For example, you can have the Shuttle control PowerScribe by just mapping F4 (dictation toggle), TAB (next field), and SHIFT+TAB (previous field) to a few buttons. But just doing that requires that you manually click over to PowerScribe for those controls to actually work. This is absolutely doable but a step down from the PowerMic.
With AutoHotkey, you can easily perfectly mimic dictaphone functions (and much more). I covered how to do that in this post: AutoHotkey for Radiology. It’s basically a copy-and-paste job. You won’t regret it.
(If you want to go hands-free but refuse to try to use AHK, then you might be the kind of person who wants this foot pedal.)
Preventing Misfires:
One totally optional step with AHK can also prevent inserting inadvertent keystrokes into reports by accident.
For example, perhaps your keyboard shortcut ‘M’ opens the measure tool, and you have that mapped to a button on your device. What you could instead do is create a separate hotkey trigger like Ctrl+M that automatically activates PACS and then presses M. That way, you’ll never insert a random letter M by accident into your report. I frequently see reports from residents with random numbers accidentally inserted as they use window/level presets on their gaming mouse with PowerScribe as the active window.
How I Use My Shuttle
The device is completely customizable.
Every button can be mapped to its own function, whether a mouse click, a key or key combination, or a macro (a longer series of key or mouse events).
To start, there is the magic wheel in the middle. You typically spin the silver wheel in the middle with your index finger, and you turn the outer black wheel like a dial (it snaps back to neutral when you let go):
The build quality on the central mechanism is excellent. The center wheel spins like butter with a gentle pleasing muted click. The outer dial is easy to turn with a single gentle finger, and the rubber feet on the buttom keep the device in place.
Then there are the 9 buttons on the top that have a plastic cover that can hold a simple paper label (see below) to jog your memory. There are two large black buttons on either side of the wheel, which is where your pinky finger and thumb naturally rest when not using the central wheel. Lastly, there are four silver buttons at the bottom, which are particularly well-suited for navigation behaviors.
One example approach:
- The top 9 buttons are for your most commonly used keyboard shortcuts. For example, in the above image, the top four buttons are window presets for soft tissues, bone, brain, and lung. The next five here are toggle dictation, spine labels, delete, measure, and link studies. Note: If you already control window/level from your mouse, you might not need/want this duplicated. You might prefer other tools like ROI, arrows, or even undo/redo.
- In the setup pictured above, I have the left-side black button toggle the navigation pane in PACS. (My outpatient PACS has a series toolbar instead of a pop-up navigation window, so I use the black button to toggle dictation instead and free up another top button).
- The right-side black button I have mapped to click-lock the left mouse button. Doing so means I can power scroll with the mouse by pressing the button once with my left thumb in a neutral position instead of having to hold down the actual mouse button with my right hand’s index finger. This removes one common source of extensor compartment/dorsal wrist pain (holding the mouse with a death grip for hours a day). If you don’t want to use AHK, I used to just map it to the left mouse button itself: Even gently holding down the left thumb to powerscroll is surprisingly effective.
- The central jogging wheel is mapped to the mouse wheel up/down to scroll (left is up, right is down). The radial ring around it has 7 clock-face settings depending on how far you turn it. I have these mapped to repeat the mouse wheel multiple times per second (i.e. scrolling faster the more I turn the wheel): 1 o’clock is 2x per second, 2 o’clock is 5x, then 10, 15, 30, 45, and 60 times per second for the remaining options. The more you turn it, the faster you auto-scroll.
- The upper row of silver buttons at the bottom are for selecting the previous/next fields in Powerscribe, and the bottom row is for loading the previous/next series of viewports in PACS.
Here is an example of the old config application’s setting I use for the outer-rim auto-scrolling:
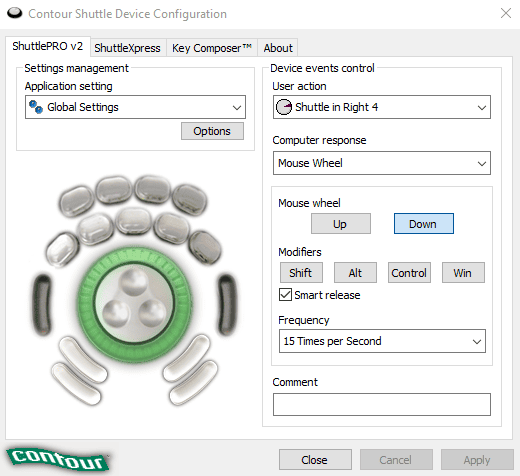
[Update: Please note that they released new software in November 2025 that is currently, according to multiple readers, not very functional. Countour tells me a new version is forthcoming. In the meantime, they’ve made the old drivers available online (they confusingly only referred to the Shuttle as the “Multimedia Controller,” but it’s the same thing).]
The Best Use of Magic Buttons
A big part of how to set up your device depends on what you’re using for your mouse and how much you want multiple ways to do the same things versus raw versatility. As we mentioned before, the choice to isolate or duplicate window/level shortcuts is a big one (and, if you choose some 48-button monstrosity, you may not need to choose at all).
The most straightforward approach is to assign different buttons to the keyboard shortcuts you use to control PowerScribe and PACS: toggle dictation, previous/next field, 3D cursor/localizer mode vs. power-scroll mode, window/level settings, measurements, ROI, spine labeling, angle, Cobb angle, delete, backspace, undo/redo, cut/copy/paste, etc.
Again, our goal is to keep your left hand on the Shuttle, your right hand on the mouse, and your keyboard rarely used for routine cases except when you actually want to type something.
(Technically, you can use the keyboard with your right hand when scrolling with your Shuttle and use the keyboard with your left hand when driving with your mouse without taking an efficiency hit. In this setting, for example, you could use the Numpad for window/level presets when scrolling with the Shuttle’s wheel and use Shuttle buttons instead when scrolling with your mouse. Everything is personal!)
Don’t skip the step of thinking about your workflow(s). You’ll want buttons to open a navigation pane or launch the report viewer for the prior exam if those are separate pop-up windows and not integrated into dedicated toolbars and windows already. I think delete comes in handy for report editing, but if your PACS has a double-click to delete feature, you may decide you can skip that shortcut. Maybe you use a Cobb angle constantly, or maybe you don’t even remember what that is. An MSK rad may use a ton of angles but a breast imager not so much.
No one can tell you the best way to set up your tools but you, and even you may find that your needs change over time. I have been switching up my techniques every so often as well. This should be a work in progress because you and the way you dictate is probably also (or at least should be) a work in progress.
Double the Fun
Another possibility to keep in mind if you want more hotkeys than you have available inputs is the addition of an additional hotkey “layer.” You can do this by assigning one of the buttons on your Shuttle or your mouse to a modifier key, like control, alt, or shift, and then assigning these additional key combinations to more shortcuts (either directly in PACS when customizable or through an AutoHotkey script as an intermediary).
For example, let’s say the letter M opens your measuring tool, you could then have the combination Ctrl+M open up the ROI tool. In doing so you can keep additional PACS tools on hand (this makes the most sense intuitively when the functions are somewhat related like angle/Cobb angle, measure distance vs. HU, delete vs. backspace, undo vs. redo, etc.).
By using a modifier, you can effectively double your button options. In practice, I think it’s the top 9 buttons that are the easiest to double up on in this fashion, and you can even label them accordingly.
Totally Optional Labels
Contour has a printable label sheet to help you label the top 9 buttons. They’ve prefilled out part of it with icons mostly geared toward video editing (the primary market for this device), leaving the rest blank for you to customize.
I’ve gone to the liberty of making a version filled with things you’d probably enjoy for radiology:
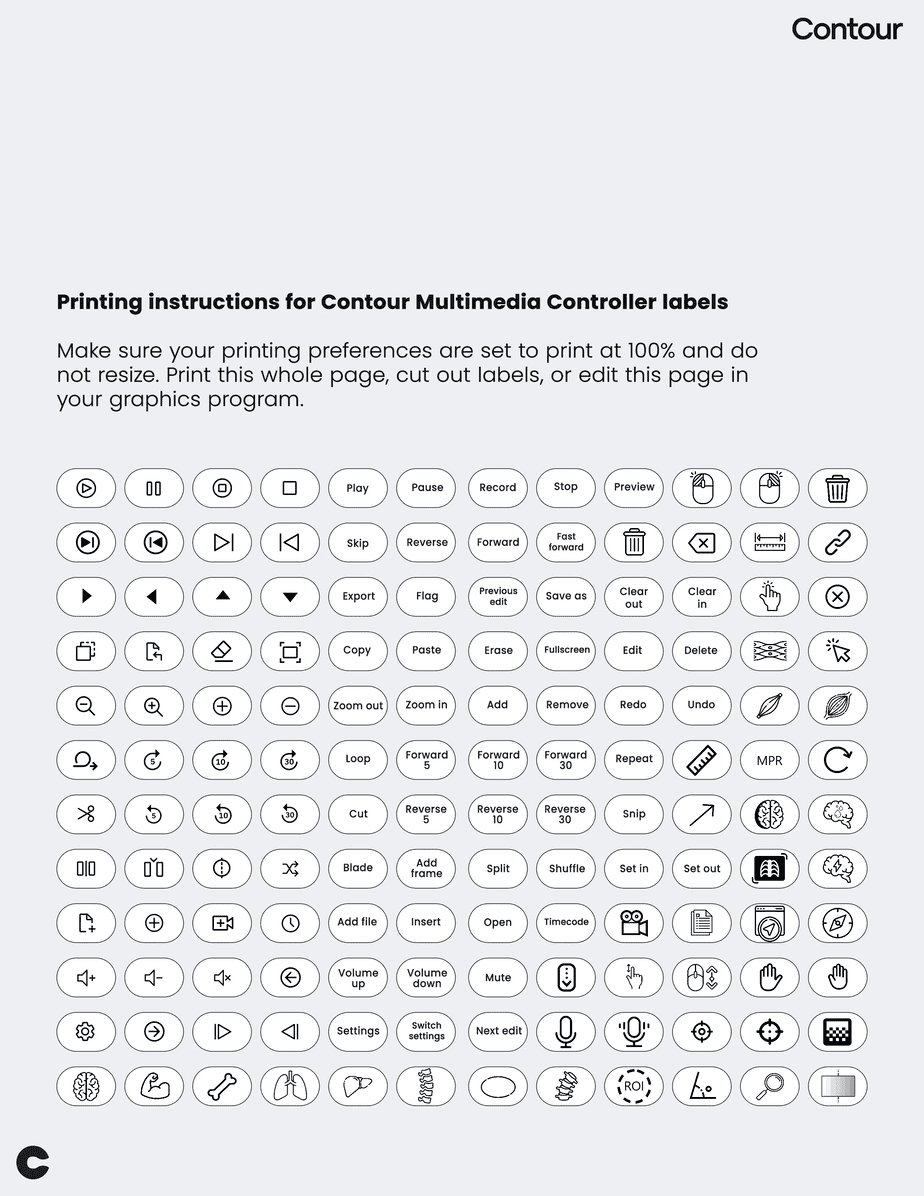
You can of course just cut out and write anything you’d like on any tiny piece of paper. Just pop the little plastic cap off one of the top nine buttons, slip it in, and put the cap back on.
Take Home
I think the Shuttle is a great choice for a device that combines productivity with ergonomic flexibility, but mostly I hope this will get you thinking about what might be best for your workflow.
In fact, as I alluded to above, I use two somewhat different configurations when working on our hospital PACS and when working in the outpatient world. The PACS are extremely different, and so my optimal workflow is different.
No matter what you choose and which tasks you choose to map to your available inputs, you should really ditch holding the dictaphone. Putting down the microphone to play with PACS is extremely inefficient, even if you’re just using the keyboard and not a fancy additional device.
And, I cannot stress this enough, once you decide to go hands-free, AutoHotkey and using an off-hand device are seriously synergistic.
With a little bit of setup, this approach is so much more powerful than hunting around the keyboard to do anything.
Read my radiology tools and toys breakdown, and read about using AutoHotkey for Radiology. The cost of inaction is real even if it’s invisible.
65 Comments
For years I used PowerScribe with a hand-held microphone, ruining my thumbs. I switched to a head set with attached microphone & was much more efficient
It’s much more efficient. For others, I personally switched from a headset a couple of years ago; there really isn’t any particular reason one needs to wear their microphone unless you love the form factor.
which headset do you use?
Does anyone know of a foot activated dictaphone? Also what headset/ microphone did u have success with please?
The Infinity 3 USB Foot Pedal works plug-and-play no setup with all microphones including the PowerMic itself.
This post includes a breakdown of popular headset choices as well as other microphones. To be honest, having something on your head is totally unnecessary, and I switched from a headset a couple years ago.
for double again (or quadruple) the fun you can add another layer by assigning CTL (or ALT or SHIFT) to a mouse button (like the ring finger button on a Logitech G600)
Indeed, there is in fact a section of this very post titled “Double the Fun” that describes using additional layers.
I’m wondering how to practically do this – I’m having difficulty programing a second layer of hot keys on the shuttle? Thanks!
So you would not program the second layer in the shuttle itself. You would add a modifier key like ctrl or alt to either another shuttle button or your programmable mouse. Then you would have the combination of that modifier key and the normal function of the shuttle combine to do something else either via your PACS settings or autohotkey.
For example, if you had the measurement tool set to M in PACS, instead of ROI being “R” or something, you would set it to CTRL+M. Then you could trigger linear measurement and HU ROI measurement with the same Shuttle button by using the modifier trigger instead of needing to dedicate two separate buttons to it (or reaching for the keyboard for less used tools).
I recently bought a contour shuttlepro 2 and could not get it to work despite hours of troubleshooting on my own and with my group’s IT dept. Ultimately came to the conclusion I was sent a defective device as it would not work on a different computer. Going to go back to the drawing board to try to find a better device. Very frustrating to say the least.
I own two and have been happy, but other readers have recently stated the new software is actually a downgrade and has been frustrating, difficult to get working. I don’t think the device itself has changed to my knowledge but perhaps it has as well. Hopefully they’ll just fix the software, the old stuff still works fine.
Same for me too. Used to work and now it doesnt anymore. Combination of both the Contour software upgrade as well as a PACS upgrade just bricked the whole thing.
I emailed them about their plans for the software since this seems to be a big problem, or at least making the old stuff available online again.
You can download the old functional software here: https://www.contourdesign.com/support/drivers/old-drivers
Probably my fourth time looking at this post and just now appreciating the custom labels you made for the shuttle. Very cool.
Thanks! I had them unlabeled for a long time, but it’s more fun this way.
Got the Contour Shuttle last week after reading your article and tried it recently for the first time on call with some AutoHotkey scripts and it was the smoothest experience ever! I really appreciate all the helpful info you’ve shared here. Among other things, I assigned TAB/SHIFT-TAB to the jog wheel for next/previous field in PS and also made that the hotkey combo for next/previous series in PACS because that wheel is butter like you said. Liked your method of scrolling without holding down the mouse left click button, and was able to find a one-line AutoHotkey script online that toggles holding down the left click button on/off. These have added significant improvements to my workflow and I truly appreciate you sharing these tips!
Hi, really great that you’ve made these posts! Have suffered from shoulder and other upper limb pains with mouse use for scrolling. Am I right that you need to install software to use the contour shuttle pro at all? I think won’t be possible with my hospital IT
Yes, all contour products require drivers. I asked my hospital IT and they were willing to install it on the stations that I read on, so I wouldn’t rule it out. That said, sometimes they reimage the computers, so a couple of times I’ve had to call the help desk to get them to let me reinstall it.
To my knowledge, there are no super neat ergonomic devices like the Shuttle or the Roller mouse that don’t require at least a driver. Accessesory keypads like the two that I listed above can work without software, but they don’t have the scrolling benefits that I personally really like.
For shoulder pain, also consider the height the desk relative to chair. Hunching the shoulder because the mouse is too high for a neutral position is a big culprit.
A vertical mouse (the Zelotes has on-board memory) + one of those might be enough to really help if you haven’t tried that form factor yet.
Does this mean that if i set up the shuttle on one computer, the settings won’t carry over to another computer unless the software is also installed on the second computer? Might be tough to get IT to install it on hospital computer
That’s correct. You’d have to get it installed on every workstation you’d want to use it on.
Hospital IT varies. I first found the Shuttle in use in one institution, and my current hospital was also willing to install it without complaint. You could always ask them first before committing.
There are several left-hand keypads that have on-board memory and do not require software if it’s truly a dealbreaker. Anyone can use *some* variant of an off-hand device in essentially every setting.
I have used my shuttlepro v2 for about 18 years
I can’t imagine using anything else
. I have a hands-free stand microphone and I assign on my shuttlepro a button to start and stop dictation
Thank you for the wonderful tips. I enjoyed the article.
So do you use the Shuttle Pro for scrolling the actual imaging study slices, or do you use your mouse with the on-off click? Or both?
Both. I actually use the wheel the most, followed by the click-lock. Spreading the behavior across both hands has been helpful for me personally.
Ben,
Great writeup and inspired me to write my own AHK scripts and abandon the Nuance PowerMic in favor of a standing desk microphone. Works awesome.
My next optimization item is to figure out a way to toggle scroll direction. I want to move the mouse left and right to scroll through a stack of images. I used to be able to do this in an older version of PACS at work and that feature went away in the upgraded versions, so I’m trying to figure out a third party method. Any ideas?
Should be possible. ChatGPT gave me this script to achieve this, feel free to give it a try:
#Persistent#InstallMouseHook
#MaxThreadsPerHotkey 2
SetBatchLines, -1; Adjust sensitivity if neededSensitivity := 5
; Set initial valuesPrevX := A_CursorX
PrevY := A_CursorY
; Main loopLoop
{
; Get current mouse position
MouseGetPos, CurrX, CurrY
; Calculate horizontal movementDeltaX := CurrX - PrevX
; If horizontal movement is greater than sensitivityif (abs(DeltaX) > Sensitivity)
{
; Scroll up if moving left
if (DeltaX < 0) { Send {WheelUp} } ; Scroll down if moving right else { Send {WheelDown} } }
; Update previous position

    PrevX := CurrX

    PrevY := CurrY
    ; Small sleep to reduce CPU usage

    Sleep 10

}
Is there a way to set up the Shuttle to not toggle dictation on and off with two individual presses of a button (one press – on, another press – 0ff) but to press and hold the button to dictate, and release the button to stop dictating, just like on Powermic? I use templates, and it seems cumbersome to move from field to field, and to keep turning dictation on and off with a separate keystroke every time you switch to a new field. And if you leave the dictation on all the time, the talking fields option doesn’t work when moving between fields, so now you have to look at PS window all the time.
I think you should able to do in PowerScribe itself, not the Shuttle. You want to dictate with the “Deadman’s Switch” instead of “Toggle On/Off” –you may need to plug in a PowerMic to switch the setting?
I personally do keep the mic on and never use talking fields, but I do sometimes navigate my templates by voice by saying “Field X” instead. Using Findings/Ambient mode is clearly the best solution, if only I would put in the work.
Ben, great articles about your workflow.
I recently started trying the shuttle combined with AHK after years of just using the standard nuance powermic plus keyboard. Is there a way to be able to toggle next field on powerscribe at a faster rate? With the powermic it let’s you toggle to different fields very quickly (if dictation is not toggled on). With the shuttle, if I tab to the next field too quickly it glitches out and inserts the letter associated with the hotkey (if my hotkey for ‘tab’ is control+shift+w, it will insert a w into the field).
Is verbal field selection just the way to go to minimize button presses?
You might play around with unchecking/checking the “smart release” checkbox and see if that helps. Unchecking it for the problematic ones did the trick for me. If still having issues, you can use a more simple single key shortcut instead of one with modifier keys, which should also work.
I do use more verbal navigation if I’m jumping around the template a lot, but I also tend to leave dictation on most of the time.
Maybe not the best post to ask this since I don’t have a shuttle, but I do have AKH and a mini keyboard. I have found that when I am in a fill in field as part of a template that has pick lists, my AHK tab function gets stuck inside the pick list and instead of tabbing to the next field (like my powermic would) it instead highlights the next pick list option and so on.
For example a thyroid US template. Pick list for composition field has choices for solid, cystic, mixed, etc. When I tab into it with AHK, it will highlight solid. Then. Cystic. Then mixed. I have to either go all the way through it before it jumps to next selectable field or speak “next.”
Any workaround?
Thanks for this great guide. Have you tried the Logitech MX Creative Console as an alternative?
I haven’t, but I know that I really prefer having the outer dial of the Shuttle than a regular wheel. If I didn’t use that, I’d use the Keebmonkey above that has onboard memory and multiple programmable layers (similar scroll wheel, more buttons, one device, no software required). The MX makes more sense than Elgato streamdeck for sure though; I bet if I were working in art or video I would love it.
A great alternative if IT blocks AHK at your institution is the duckypad:
https://dekunukem.github.io/duckyPad-Pro/doc/landing.html
With this, you can program single keybinds to move over the powerscribe window to toggle dictation, navigate fields, move to the end of a line of text, etc. It has proprietary scripting software that allows complex key inputs. It’s been pretty reliable for me since I switched jobs to an institution that forbids autohotkey.
Thanks for sharing!
Hi Ben,
First off, thank you so much for all this awesome guide to improving radiology efficiency. I stumbled across your site in the wee hours of the night, after desperate google searches including left-handed mice (I’m right-handed :)). I got the contour shuttle pro, the Zelotes mouse, a phone stand, installed AHK and am so happy with the changes.
Re the shuttle pro outer dial- even if I set the mouse wheel frequency to “as fast as possible” – the response still feels quite slow, compared to powerscrolling. In windows even if I set the number of lines to scroll to 99 (maximum) – it is maybe a little faster. Did you encounter this? Wondering if I’m missing something. Thanks so much!
I find that 60 times per second is pretty fast except for with 1mm slices like a CTA. Even then it’s usually pretty good for me, but I agree it’s not as fast as what can be achieved with powerscrolling.
What I’ve done is utilize the click-lock AHK script mapped to a button on the shuttle and my mouse to turn on powerscrolling without having to actually keep squeezing the mouse button; that’s what I use if I really need to go up and down at warp speed.
You could probably adjust the script in this Autoscrolling post to go faster by adjusting the “scrollspeed” to the desired amount and mapping that hotkey combination to the shuttle.
It seems that the software was changed from the screenshots here, and even different from what is in the online manual for the shuttle. Program interface is completely different, and doesn’t seem to have a way to change the frequency of scrolling inputs per second like in the screenshot above. Fewer options that just amount to binding each function on the device to keyboard strokes or single mouse inputs.
Frustrating, as scrolling with the outer jog wheel was half the reason I purchased this. I’m trying to contact the company and see if it’s possible to download the older software. It’s not posted in the old drivers section of the website.
Regardless, thanks for this post and others on efficiency. AutoHotKey next on my list…
Must be a very recent change, I haven’t tried the new software yet; it’s odd that they would break it. Let me know what they say, hopefully they’ll fix the new version as well if there was an oversight in its crafting.
Company confirmed that this is in fact the new software and that additional updates are forthcoming. Odd that they would make this the only downloadable version if it has fewer features.
They did send me a link to download the old version. Haven’t installed it yet.
If the old software is working for you, I don’t recommend the upgrade until they bring it at least on par with the older version.
Hopefully people considering taking the plunge with the shuttle read down to the bottom of the comments!
Yeah old software works totally fine still. I’m using it on multiple workstations without issue, don’t see any reason to update it at the moment.
Andrew, how long after you reached out to Contour did they reply back? I’m running into the same issue you had with the new driver install. My old workstation still has the old driver which works perfectly though.
Old shuttle software here: https://www.contourdesign.com/support/drivers/old-drivers
Ben, thanks so much for all of your posts. As a radiologist in training these have been a huge help to me.
I was wondering where you got/created the icons you provided for the shuttle?
I am setting up a logi MX master with the new actions ring function and am in the market for good radiology icons. Thanks
Pretty sure I used https://www.flaticon.com/
How do you get your offhand device (Shuttle or other) to fully emulate the Powermic buttons? i.e. toggle dication on/off or tab through fields even when PS is not the active window? The PS keyboard shortcuts do not work when PACS is the active window and I would think the Shuttle would behave the same if it just maps keyboard functions. Same question for foot pedal… will it know to toggle dictation when PACS window is active?
Just found the answer in your AHK tutorial :)
Is there any workaround if IT does not allow AHK?
Great info on your site btw, much appreciated.
There is often a workaround by compiling the script to an executable, then loading that onto the computer via onedrive or something along those lines.
If not, I would seriously throw a fit and demand they compile their own script that they can approve of that can’t be changed by the user. It’s that important to me.
hey ben, i cant seem to make the old driver work on my macOS tahoe, do u know anyone that can? the new driver is just such a pain
The old driver still works on the newst version of Windows, but I haven’t tried on recent iterations MacOS. Potentially reverting back to an old version of the OS would magically help. I am genuinely surprised they released this new software and haven’t fixed it yet, it is completely unusable. Hopefully they finish the patch soon as promised.
Great article that I’ve referenced many times over the years. Unfortunately our hospital recently blacklisted auto hotkey. Any suggestions on how to imitate the powermic buttons without it? I can use the hotkeys from a keyboard or offhand device, but having to activate the window by clicking is a major shortcoming.
That is everyone’s greatest fear who employs this workflow.
The only pseudo-workaround I know of is to use an off-hand device to add alt-tab to one of the keys, which will switch to most recently active window. If you just switch between powerscribe and pacs, it would work most of the time.
Otherwise, the The Infinity 3 USB Foot Pedal is good plug-and-play hardware solution.
Lastly, in that situation, you can keep dictation mostly toggled on and navigate by voice. This is most painless if your template fields are short and logically named (say “field x”) in addition to the built-in “previous/next fields.”
I appreciate why a hospital would block AHK broadly. But then, what they should do is compile a single script that they have vetted into an executable that is whitelisted so that this limited but key functionality is preserved. If they balked, I’d probably file for ADA accomodations to try to force their hand.